Holiday Home Prep
It’s the merriest season…but also the busiest! You’re wrapping up big projects at work, buying gifts, trying to squeeze in time for traditions – and attending special school events, attending (and hosting!) holiday parties…
And that’s all before we even get to the main event.
It can be overwhelming. So we’ve come up with a checklist to help you prep for a few of the major parts of the season…decorating, cooking, having guests, and receiving gifts.

The ideas below are certainly not meant to add to your feeling of overwhelm, but to give you simple tasks that will pay off in a big way once the holidays arrive in full force and for future holidays to come!
Keep reading to the end for a simple printable that you can use to check these items off your to-do list.
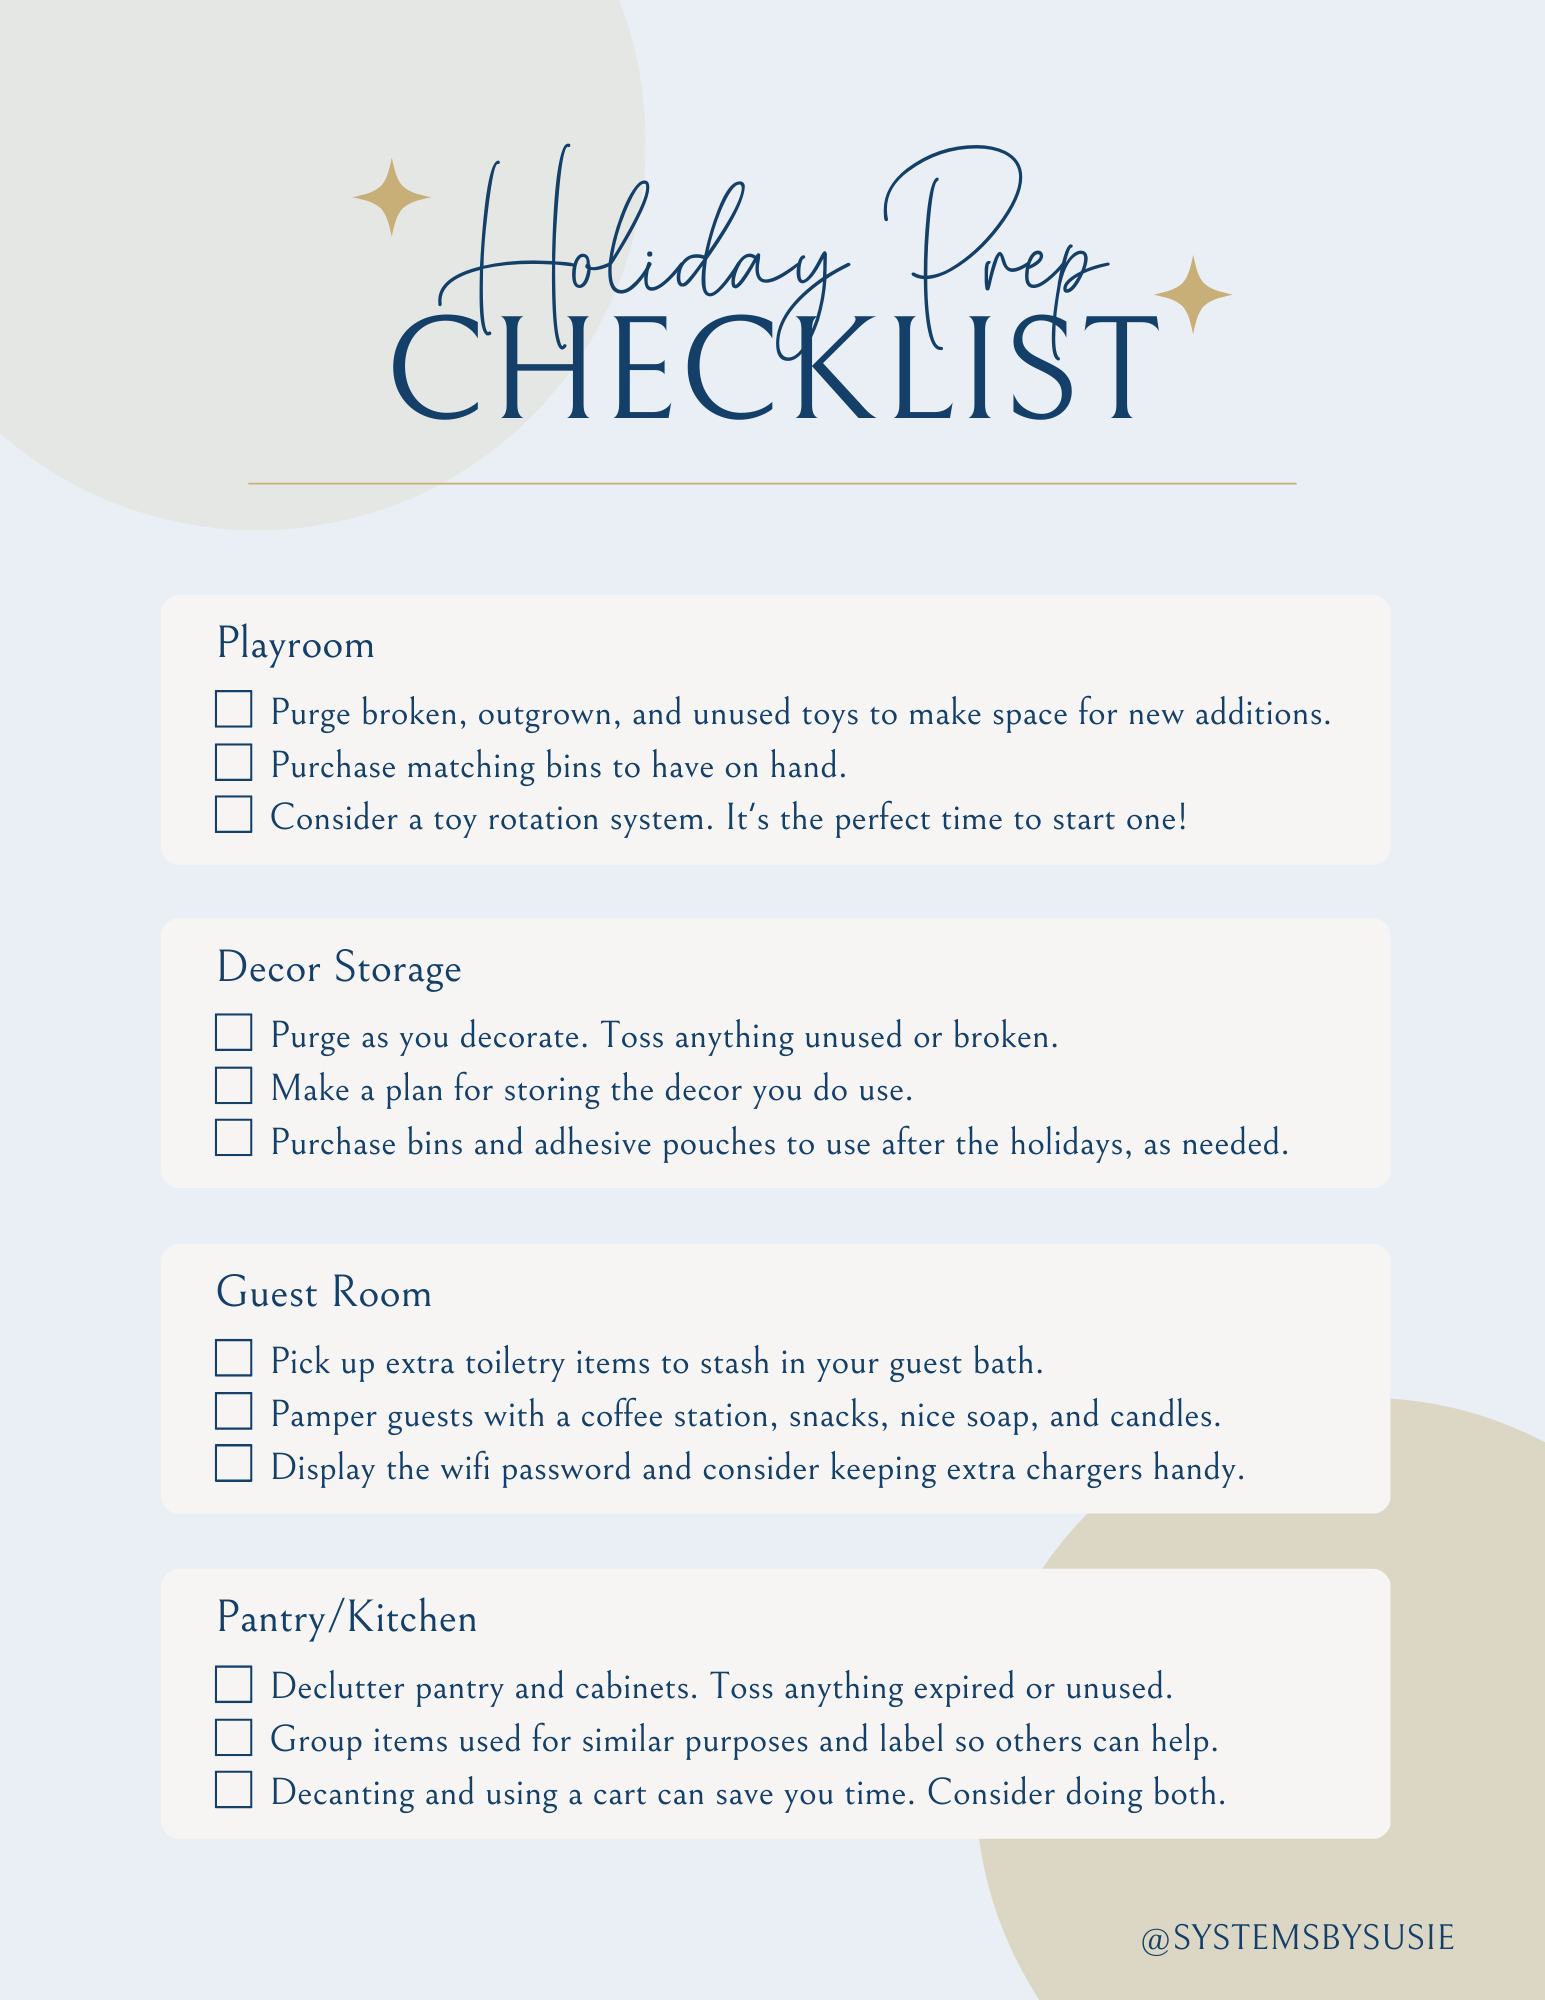
- Playroom
There are a few times a year when I recommend a playroom refresh, and just before the holiday season is at the top of that list. Even if your family focuses on experience gifts, there is still likely to be an influx of toys from other relatives.

Here are a few things you can do to start making space for the new arrivals. Whether you do this with your kids or while they’re at school/childcare is up to you – you know them best!
- PURGE. Be ruthless. If the toy is broken, it’s gone. If your child has outgrown the toy, either donate it or bin it up for the future. If your child hasn’t played with the toy in more than six months, donate it. (You can always box things up and keep them somewhere safe in case your kiddo asks about it. Chances are they won’t, but this is an option.)
- Make a plan for new toys you know are coming your way. If you are expecting a big ticket item from the grandparents, make sure you know where it’s going to go and clear out enough other toys to make room for it.

- Grab some extra bins. If you already have an organization system in place, it’s a good idea to shop for a few more matching bins. Set them aside in case you need them, and if you don’t, you can return them in January.
- If you’ve been considering a toy rotation system, now is a good time to start. If you don’t have much to purge, but still need space, bin up the less frequently used toys (or anything off season) and keep it in a closet. You’ll make room for holiday additions and keep kids interested in the toys they already have all year long. Remember to make a note on your calendar to swap out the toys in the rotation at the beginning of each season.
If you really want to deep dive into a full playroom refresh, visit this blog to see all of my recommendations.
2. Décor Storage
As you are decorating this year, pay attention to how you decorate. It will help you when it comes time to take everything down. Now is the time to create a plan for storing your essential décor.
Should you…?
(Option 1) Store by room. If you have a large home and a lot of decorations, and you tend to decorate in the same way each year, this is the option for you! Plan to pack up everything in each room and label it “Christmas Living Room” (for example). That way next year, you can distribute bins accordingly and get to work so much faster.
(Option 2) Store by item. This is a good approach if you change up your decorations from year to year and want to be able to find what you need quickly. Plan to put all your garlands in one bin, all your lights in another, etc. Consider purchasing more specialized holiday storage bins for lights, garlands, ornaments, etc.

If you put up a tree, how did it go getting it out of storage this year? Storing artificial trees in their original boxes is always the most compact solution. BUT it’s not always an option, and they can be HEAVY! Consider purchasing a rolling tree storage bag, or splurge on an upright option to save space (and your back)!
Two more things to keep in mind:
- Use it or lose it. As you are decking the halls and stringing the lights, set aside anything you don’t plan to use. If you didn’t use it last year and can’t picture yourself using it next year, add it to the donation pile. (This is a good habit to get into for every holiday of the year.)
- My number one rule: don’t write on your storage bins with sharpies! When the contents change (and you know they will), you won’t be able to remove it. Instead, order adhesive pouches and put labeled index cards inside. These are so easy to swap out when the need arises!

As you decorate this year, count up how many bins you might need for your storage preferences. In my opinion, clear bins are best, for the same reason you don’t put sharpie marks on your totes. Things change. Keep everything neutral so as your needs change, your bins can too. You’ll get a longer shelf life out of the investment.
I have a whole separate blog on this topic, too. Be sure to click over to it for more details and for all of my favorite products to help you keep things in great shape until you need them again next year!
3. Guest Room
Playing host during the holiday season can be stressful. Here are a few easy tips for making your guests feel pampered, while also providing them with everything they need to be self-sufficient in your home – freeing up your valuable time for other important tasks.
- There’s nothing worse than arriving at your destination and realizing you forgot your toothbrush! I love the idea of having a basket in your guest bathroom of items your guest may have forgotten, like ibuprofen, toothpaste, deodorant, a razor, etc.
- Everybody has different schedules and ways they make their coffee – allow your guests the freedom to make their own drinks in the morning and evening by setting up a drink bar in the guest room. Throw a couple of snacks in a basket, too, to satisfy those late-night cravings!

- Have a fresh, cozy robe and pair of slippers available. This is the easiest way to make a guest feel pampered! Continue the spa feel into the bathroom, with a nice candle, soap, and bath salts.
- Display the wifi password in a cute frame in their room. (You know they’re going to ask for it!) Want to level up? Add a QR code that directly connects them to your network and keep extra chargers in the nightstand drawer.
4. Pantry/Kitchen
Chances are you are going to be spending a lot more time in the kitchen and pantry over the next month. If you hosted Thanksgiving, you are probably very familiar with the pain points of your space. Take some time before the next holiday to see what you can do to alleviate some of the pressure. Here are a few tips that might help you:

- Use zones. In both your pantry and your kitchen, group together items that you usually use at the same time. For example, all of your spices should be in one cabinet or drawer, near where you cook/bake. Similarly, your baking essentials (like measuring cups and mixing bowls) should be within arms reach of the counter area you use for this task.
- Decant the Basics. Decanting is not for everyone, but I promise it will save you time during the holidays. You don’t have to decant everything, but consider it for the things you use most (flour, sugar, etc.). Decanting keeps things accessible, fresh, and you will also know how much you have so you don’t run out. (There’s nothing worse than a last-minute trip to the store on a holiday!)

- Consider a cart. If you have an awkward or tight space, a rolling cart might be the solution to keeping things nearby, but also being able to store them away when not in use. It will also save you time running back and forth to the pantry if you use it to gather ingredients for the main meal.
- Declutter. It’s a simple step that will help your kitchen and pantry breathe during this busy time. Set aside a few hours one weekend, and go through the pantry and each cabinet and drawer. If you aren’t planning to use it during the holidays and you haven’t used it all year (or, in the case of food, if it’s expired) it’s time to say goodbye.
- If you are having guests over this year, bust out the label maker. It will be so much easier for others to help you when they can easily see what you need. For boxed items, like baking mixes or stock, pick up some inexpensive bins, group them together and pop a label on the front.
To make holiday prep even easier this year, I have put together a quick checklist for you. Click on the image below to download and print.
Keep it handy as you go about the next couple of weeks and enjoy the feeling of marking things off. (Isn’t that the best?!) I hope it will help you feel confident and prepared during this busy season, so you can focus on family time and all the joy that comes with this time of year.
If you need a little extra help with these tasks, or storing your holiday decor in the new year, reach out to get on our schedule.
Happy Holidays and Happy Organizing!
Susie

ABOUT
Each of my career choices-wedding coordinator, event planner, and teacher — gave me the creative freedom to organize everyone and everything. I have always thrived on to-do lists, planners, and systems! Now, I lead a team of organizers to help me on my mission. Read more…


