Creating an After School Drop Zone System
It’s hard to believe another summer has passed and that’s it’s already time to send the kids back to school! As the lazy days of summer come to an end, I’ve been working on getting systems in place for the upcoming school year.
I firmly believe that if you don’t have a good system set up, clutter and chaos will follow. If you really want to be organized and stay organized, then you have to have a system in place that works for you and is something you can maintain. That means there isn’t one right system for everyone. The systems that I share on my website may need to be tweaked to fit your personality, your home, and your children’s natural habits. I’m always noting what works and what doesn’t in my house and then I make adjustments along the way. I would encourage you to do the same. Don’t give up on something right away because you can’t keep it up. Look at where the system starts to fall apart and come up with a different creative solution. As always, if you need any help setting up a personalized system for you and your family, I’m available to come to your home and help you!
The first system I tackled was in our mudroom, since it’s the first stop when the kids come home from school and it’s where they naturally drop everything. That’s why we call it the “After School Drop Zone.” I’m going to share how I created a drop zone for our family in hopes that it will inspire you to do the same. I’ve found an easy and inexpensive system to keep us organized the whole school year.
OUR OLD DROP-ZONE
A few years ago, I worked with the space and materials we had, and created an After School Drop Zone System that has worked fairly well for our family. The space we have to work with is small and wedged between the garage door and a spare refrigerator in the laundry room. I have just enough room to fit all the gear from 3 kids. (You could also install this same system in an entry closet.) This was my old system with hooks for backpacks, baskets for shoes, and a photo above each.

In my experience, you have to make systems EASY if you want kids to maintain it, and hooks are always the easiest option. I use hooks for hanging bathroom towels, robes, sweatshirts and backpacks.
For shoes, I always suggest baskets. There are few children who will take the time to line up their shoes on a shelf. I don’t even like to do that! So, put a cute basket where your kids naturally drop their shoes and you’ll have contained the chaos of shoes lying around everywhere.
WHY THE SYSTEM WASN’T WORKING
In addition to this drop zone, I also had my childrens’ weekly schedules posted in our kitchen and a place where I hung upcoming events, like birthday party invitations, school flyers, etc. After reviewing their homework and school work, they would put their homework in a hanging wall file in the kitchen and their “keepers” (the school and artwork that we wanted to save) in a basket in our homework room. The major flaw in this system was that all of these things were in different rooms, so often homework and keepers ended up on the kitchen counter. Just too complicated.
Rather than nag the kids for another year, I was determined to make it easier for them and set them up for success. So, I combined everything and now it is all in ONE spot. This is how I did it…
SUPPLIES
First, I gathered these supplies:
Hooks
Hanging Wall Files
Magnetic Dry-Erase Boards
File Folders (3 for each child)
Wire Baskets for Shoes
Letters with the Kids’ Initials
Magnets
Dry-Erase Pen
Label maker (not necessary if you hand-write the labels)
- Hanging materials: hammer, level, pencil, ruler, Museum Putty, OOK hooks,
or Command Velcro Strips
(Note: Some of the links in this post are “affiliate links.” If you decide to click on the item and purchase it, I will receive an affiliate commission. This doesn’t cost you anything more. You have my word that I only recommend products that I personally use and love!
If you want to find a cute hanging wall file for your space, I often see them at Home Goods, TJ Maxx, Marshalls and Pottery Barn. But, because I wanted to really max out the functionality of my small space, I went with another option.
I went to Office Depot and shopped in the “See Jane Work” line. I seriously LOVE these products! The whole line is designed for busy moms and their products are cute, well made, functional, easy to install, AND reasonably priced. I’ve purchased countless products for myself and my clients, and they hold up really well. They just really meet the needs of busy families like no other products I’ve found.
They sell a system with hanging wall files in black or white, magnetic dry-erase boards, and cork boards. They are designed to all hang from each other, and so you can mix or match them however you want. Depending on your needs, you could hang 3 wall files from each other, or a trio of a wall file, dry erase board, and cork board. I chose to use a hanging wall file on the bottom (easier for the kids to reach) and a magnetic dry erase board on top. I purchased everything I needed for under $100.

INSTALLATION
I hung the magnetic dry-erase board and wall file using a level and OOK hooks(my favorites!). Another option is to use Command Velcro Strips if you don’t want to damage the walls.

I started by hanging the two outside Dry-Erase Boards first and then eyeballed the spacing on the middle one. You only have to install the top thing you are hanging because everything else will hang from it.
Once everything was hung, I used some Museum Putty to keep the bottom items from banging against the wall. Museum Putty, if you haven’t heard of it, is a removable putty that keeps things in place, like drawer organizers, picture frames, etc. It’s awesome.

I didn’t need to hang wall hooks for the backpacks since they were already there. But, if you do, I would suggest you buy sturdy hooks and mount them securely, because backpacks can get heavy.
I also bought some metal letters at Michael’s with each child’s initial to hang above everything. Labeling is KEY so be sure to find some way to identify each child’s Wall File, whether it’s using vinyl letters, a label maker, or print something out and attach it using glue dots (my solution for attaching everything!). You can find some free labels to print on my Labels for Organization Pinterest Board.

HOMEWORK FOLDERS
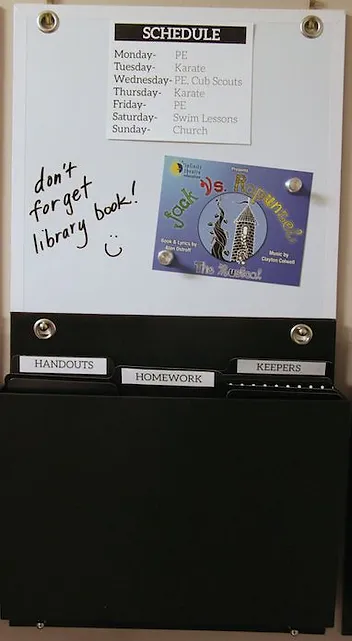
I then added 3 file folders for each child labeled “HOMEWORK,” “HANDOUTS,” and “KEEPERS.”

HOMEWORK– For any Homework that needs to be completed or any papers related to their homework.
HANDOUTS– For school flyers, newsletters, permission slips, order forms, etc. You get a bazillion of these, right?!
KEEPERS- I sort through daily school work with each child, praise them for their effort, review any missed problems, and then decide what to keep and what to recycle. Since we do this on a daily basis, it never builds up. Only their best work goes in the Keeper file. Then, once a semester, we put their “keepers” in their School Memory Box. More on that later…
UPCOMING EVENTS & SCHEDULES
On their Magnetic Dry-Erase Boards, I added magnets to hang upcoming events, like birthday invitations and school flyers.
I also typed and printed out their weekly schedule. This helps both of us remember which day to return their library books, bring a toy for Show & Tell, and all their after school activities.
I still have plenty of room to write them specific reminders on the dry-erase board as needed. Better yet, I can encourage my kids to write reminders to themselves on their boards. This is important for several reasons:
Kids need to learn tools to be organized at an early age.
Writing things down always helps you remember it.
It shifts the responsibility to the child if they forget something
SHOES
Below their backpacks, I swapped out my cloth baskets and purchased 3 new wire baskets from Michaels. I loved that they fit my spot perfectly and had a place for labels. I think the wire baskets will be an improvement because the kids can see what shoes they have. “Out of sight, out of mind” is especially true when it comes to kids. Here are some similar baskets from Amazon.

LAST MINUTE REMINDERS
I left my chalkboard vinyl decal on the back of the door to the garage because it’s been a great way to remind all of us of things we don’t want to forget. It helps that it’s the last thing we see before walking out the door. I often write myself reminders there at night when I’m prepping for the next day. I have a terrible memory, so I use lots of tools to compensate!! One of my hilarious children (note sarcasm) wrote at the bottom (in permanent chalk marker no less), “We know!” If only that were true…

Ta-dah! I now have an After School Drop Zone system that has everything we need to be organized and stay organized, all in ONE place, for under $100.

TRAINING
You’re not done yet. It will take some training to get the kids used to the new system, so for about 2 weeks, I will stand near the drop zone when they get home from school and direct them. It’s essential to spend the time training your kids if you want a system to work! The good news is that once the training is done, your kids will be able to maintain the system and you won’t have to constantly nag them.
AFTER-SCHOOL ROUTINE
To recap, this is our new after-school routine. It looks long, but in reality will only take a few minutes.
Hang up backpacks
Place shoes in baskets
Bring parent all school papers & review work together (remember to praise their effort and not necessarily their grade!)
Kids put all homework sheets in labeled file folder
Kids put all “keepers” in labeled file folder
Parent reviews ALL the school handouts right away and deals with them on the spot. Add dates to the calendar, sign forms and immediately put them back in the backpack to take back to school, and then put things you’ll need for future reference in the labeled “Handouts” file.
Hang upcoming events on Magnetic Dry-Erase Board with magnets
Write any reminders on Dry-Erase Board using dry-erase pen
Recycle all left over papers (for the kids who want to keep everything, you may have to do this after they leave the room)
With this new system, you’ll be less likely to forget things, and won’t ever misplace papers or miss deadlines again!
MAINTENENCE
I’ll need to do my part to maintain this system by regularly removing outdated events from the Magnetic Board, and erasing old reminders. If you leave an old reminder up for too long, the kids will stop noticing the board all together.
I’ll also need to clear out the “keepers” when the file folder gets too full. As I mentioned earlier, I place all my kids’ “keepers” in their School Memory System™. This is a box with 18 file folders, labeled from Preschool to Highschool. At the end of the year, we do a final sort through the “keepers” and then place everything in this box. The kids also fill out a School Year Interview and I put all their school and sports photos in protective sleeves. It’s the best thing EVER. I have maintained mine for 5 years and it’s just so darn easy to stay on top of school keepsakes with this system.
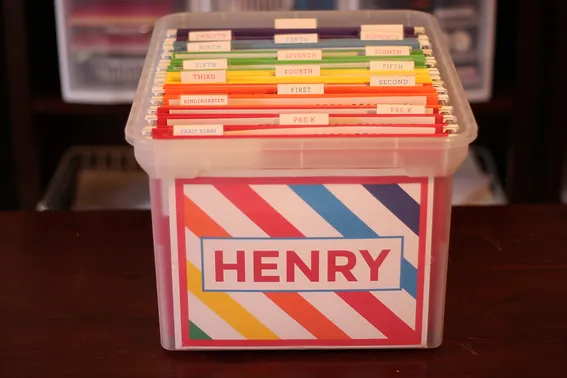
I know many busy parents who would like School Memory Systems™ for their own children, but don’t have the time or inclination to make it themselves, so I’ve started selling these in a variety of cute colors and patterns. I personalize each one with the child’s name, and include all the School Year Interview sheets and page protectors, fully assembled, in each year’s file.
If you’d like to order one, check out my online Shop, or if you live locally in Annapolis, Maryland, email me at systemsbysusie@gmail.com so you don’t have to pay for shipping.
If you want to see other drop zones for inspiration, you can check out my Drop Zone/Mudroom Pinterest Board.
Want more systems to organize your family and home? Be sure to subscribe to my newsletter on my Website, and follow me on Facebook and Instagram.
Thanks so much for stopping by!
Susie
***UPDATE***
I always believe in “tweaking” systems after you’ve lived with them for a while. After using our new Drop Zone system for a month, I decided to add a “See Jane Work” Cork Board to the wall hanging system. I designed new (and cuter!) weekly schedules too. Now I can use the whiteboard for daily reminders and the corkboard for handouts and upcoming events. As you can see from my Kindergartner’s whiteboard, this is definitely birthday party season! The whole system is working better than I expected. It’s so nice having everything in one place and the kids always know where to put their things. Now they have NO excuses!  Here’s what it looks like now:

Here’s another version I did for a recent Back to School Organization Workshop using the white version.

I would love to see your version of a Drop Zone via Instagram or Facebook using #systembysusie. Happy Organizing!

ABOUT
Each of my career choices-wedding coordinator, event planner, and teacher — gave me the creative freedom to organize everyone and everything. I have always thrived on to-do lists, planners, and systems! Now, I lead a team of organizers to help me on my mission. Read more…


